The methods and procedures discussed here are considered risky and you should not attempt anything if you don’t know completely what it is. If any damage occurs to you or your device, we won’t be held liable — you only will be responsible, you’ve been warned!!!
Compatibility
This firmware and the guide below is compatible only and only with Samsung Galaxy S2, model number i9100 (international version). Check your phone’s model number in: Settings » About phone. It’s not compatible with any other device, whether it’s any other Galaxy S2 variant (Skyrocket, T-Mobile S2, Epic 4G Touch, AT&T S2, etc.) or not. Things to take care of before Installing ROMs
Installing/Flashing this ROM will erase your apps and data. So, it’s a very important you back them up before proceeding further. To backup your apps and important data — bookmarks, contacts, SMS, APNs (internet settings), etc. this Android backup guide would help you. Restore APN settings if Internet isn’t working for you, after installing the rom. And if you are using a rooted phone, you can save application’s data too, using Titanium backup(free app on android market) to backup apps with apps with data. Use the same app again to restore those apps with data.
Drivers! — it’s important you’ve the proper drivers installed. Download links — 32 bit (x86) Windows | 64-bit (x64) Windows
How to Install XXKP1 — Leaked Android 4.0 Firmware — on Galaxy S2 i9100
Obviously, one needs to use Odin software. Detailed step-by-step guide is all you need. But if this is your first time, you may want to watch a video before actually trying this. We’re in the process of uploading the video, which visuals out the steps given below — so wait if you want to watch the video first before trying it yourself. That said, the steps below are more than enough on their own, too.
- Download the XXKP1 firmware. Download Link. Filename: I9100XXKP1_Android_4.0.1_CUSTOM.rar. Size: 329.8 MB. [Password: samfirmware.com]
- Extract the downloaded file I9100XXKP1_Android_4.0.1_CUSTOM.rarto get these 4 files:
- I9100_APBOOT_I9100XXKP1_CL16459_REV02_eng_mid_ship.tar.md5
- I9100_CODE_I9100XXKP1_CL16459_REV02_eng_mid_ship.tar.md5
- I9100_KERNEL_I9100XXKP1_CL16459_REV02_eng_mid_ship.tar.md5
- MODEM_I9100XXKP1_REV_02_CL1085642.tar.md
- Download Odin software. Filename: Odin3-v1.85.zip. Size: 198 KB. Download Link (http://oron.com/syx1ucq09bs0). Extract the zip file to folder to get 2 files – Odin3 v1.85.exe and Odin3.ini. Do not delete the .ini file since it’s very much required, too. When asked in step 6 below, open Odin by double clicking on the Odin3 v1.85.exefile.
- Disconnect your Galaxy S2 if it’s connected to PC. Switch Off your phone. Wait for vibration to confirm complete switch off.
- Now, put Galaxy S2 in Download Mode — press and hold these keys together: Volume_down+Home+Power. This is required to install XXKP1, or any firmware, on Galaxy S2 using Odin PC Software.
- Open Odin (from step 3) — Odin3 v1.85.exe.
- Connect your phone to PC now. You should get the message “Added! !” under the Odin’s message box in the bottom left. (If you don’t get this message, than probably there is a problem with drivers. Make sure you’ve drivers installed.)
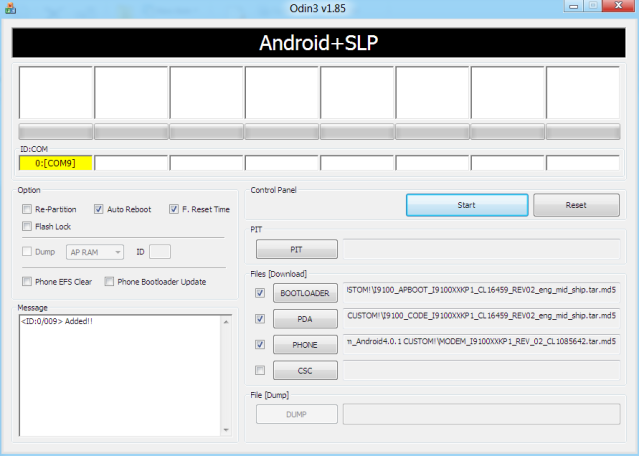
- Select these files in Odin at respective tabs:
- Click the BOOTLOADER tab, and select I9100_APBOOT_I9100XXKP1_CL16459_REV02_eng_mid_ship.tar.md5 (from step 2.1)
- Click the PDA tab, and select I9100_CODE_I9100XXKP1_CL16459_REV02_eng_mid_ship.tar.md5 (from step 2.2)
- Click the PHONE tab, and select MODEM_I9100XXKP1_REV_02_CL1085642.tar.md5 (from step 2.4)
- Important! On Odin, Do NOT tick the ‘Re-Partition’ and any other checkbox, and keep the ‘Auto Reboot’ & ‘F. Reset Time’ checkboxes ticked. Do not touch any other checkbox or tab or anything, except as was required in step 8 above.
- Double check everything said in step 8 and 9 above. [And, do not use the file in step 2.3 anywhere here, it’s useless for you]. Below is the my Odin;s screen while flashing XXKP1, and your Odin’s screen should like this too:
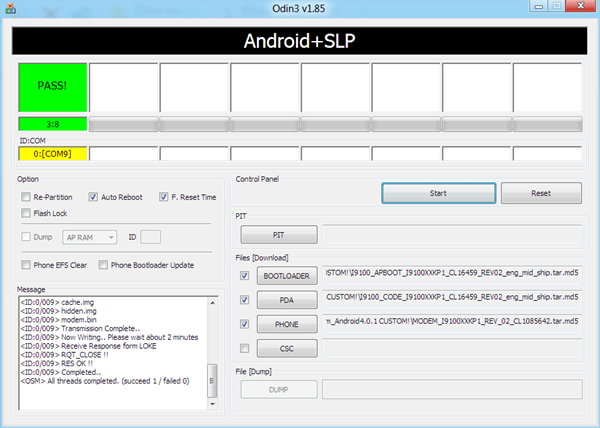
12. When process at Odin finishes your phone will reboot into recovery mode. Plus, you’ll get a PASS (with green background) message in the left-most box at the very top of the Odin. If it’s in RED and FAIL written over it, the process flashing process wasn’t successful. Try again the steps 4 to 11. On success, screen would look like this:
- In recovery mode, use volume keys to browse between options and go to and select reboot system now using Power key. The phone will restart, and your eyes will be feasted with same ol’ Samsung boot anim since the days of good ol’ Galaxy S i9000 instead of special, new, a-bit weird and default Ice Cream Sandwich animation you’ve probably see on Galaxy Nexus. No probs, though, right?
- (Optional, of course) If you found this guide useful, share it with others too on webpages, forums, your Facebook/twitter/Google+ pages, etc. That would be helping us grow too ;)
Do let us know about your experience of the XXKP1 ROM in the comments below.
Speaking of which, mine isn’t too good. XXKP1 is buggier than custom Android 4.0 rom we’ve got thanks to cool development community. TW4 doesn’t feel that cool as it felt for till now, and an option to install/use stock Android 4.0 launcher would be win-win. Face unlock is cool, btw, and works like it should. Browser feels awesome, but the windows management has been a bit ruined by Samsung by using their own UI, in place of Android’s — the latter is coolest we’ve seen on any browser.
Other than that, settings screen hasn’t seen too much tweaks — which is a good thing — and all new ICS special features are there, working fully.
But that doesn’t mean it’s a good build, for most of the part, touchscreen gets moody and not behaves well. Gestures works opposite of usual, which irritates a lot. And there are many other things, listing each one out would spoil the fun, so I’m stopping here. Last thing, that red border which is present almost everywhere upon touch, is very very awkward.
Btw, screenshots can be taken now using Power key and Volume Down together, instead of what we used earlier: Home and Power. Press Volume down and Power together and hold for 1 sec. Screenshot will be taken, saved in sdcard/Pictures/Screenshots directory, and you’ll be notified of that in notification bar, with a preview, albeit. Cool! Swipe left/right on it to remove that individual notification. ICS is here, man!
No comments:
Post a Comment